Mastering LED Headlight Installation – No. 1 Guide to Perfect LED Orientation in Reflector-Based Headlights

LED Headlight Installation – Whats the right way to install LED in Reflector-Based Headlights
As vehicle technology advances, more drivers are turning to LED headlights for their superior brightness, energy efficiency, and ease of installation. Whether you’re installing Durvient LED headlights or another powerful headlight brand, upgrading your vehicle’s lighting can be a simple DIY task, even for beginners. This guide will walk you through the process of LED headlight installation for both reflector-based headlights and hollow projectors, ensuring a hassle-free and professional upgrade for your vehicle.
Understanding LED Headlight Orientation
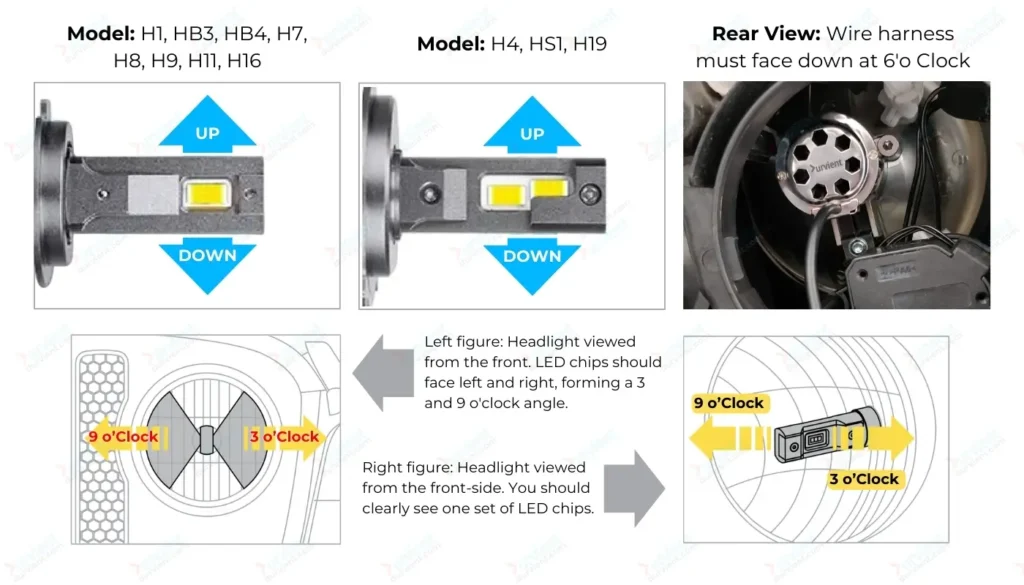
Proper orientation is key to getting the most out of your Durvient headlight installation. For reflector-based headlights, the diodes (LED chips) should be in a side-to-side orientation, with one set of LEDs facing at 3 o’clock and the other set at 9 o’clock. This positioning ensures a nice, even 360° light distribution throughout the housing, creating an even beam of light and properly filling the housing.
For LED bulbs like H4, H7, H8, H11, and others, this side-to-side orientation remains consistent, allowing for optimal performance. The Durvient LED headlight will deliver powerful lighting, but correct orientation is essential for the best results.
LED Headlight Installation for Reflector-Based Headlights
Installing LED headlights in reflector-based housings is a straightforward process. Here’s how to do it:
-
Prepare Your Vehicle
- Before starting, make sure your vehicle is turned off and the headlights are cool. This prevents any risk of electric shock or burns. Optional: Disconnect the negative terminal of the car battery to avoid accidental short circuits.
-
Access the Headlight Assembly
- To reach the headlight assembly, remove any grilles, bezels, or other components that might be in the way. Consult your vehicle’s owner’s manual for specific instructions. Usually, removing a few screws or clips is all that’s needed.
-
Remove the Old Headlight Bulbs
- Once you have access, locate the old bulbs and carefully remove them. Note the orientation as you remove them; this will help with the correct placement of the new Durvient LED headlights.
-
Proceed with the New LED Headlight Installation
- With your Durvient headlight ready, align the tabs, notches, or pins on the bulb with the corresponding slots in the headlight assembly. Gently push and twist the bulb into place, ensuring it’s securely seated and properly aligned.
-
Test the Headlights
- Reconnect the car battery (if disconnected earlier) and turn on the headlights to check the low and high beams. Make any necessary adjustments to the alignment. If the Durvient LED headlights don’t illuminate as expected, double-check the installation.
-
Reassemble the Headlight Assembly
- Once everything is working correctly, reassemble the headlight components. Ensure all screws and clips are securely fastened.
Installation Process for H4, H7, H8, H11, and Other Bulb Sizes
For bulb sizes like H4, H7, H8, H11, and others, the installation process is similar, but with slight variations based on the bulb type. H8 bulbs, for example, are cross-compatible with H9, H11, and H16, allowing for versatile installation options. No matter the bulb size, the LED chips should always be oriented at 3 o’clock and 9 o’clock.
For H4, HS1, and H19 bulbs used in motorcycles or scooters, it’s important to note that these are dual-beam bulbs. The shield covering the low beam should be positioned so that the LED array on the top side of the bulb faces upwards. This orientation ensures the correct beam cut-out on low beam and an appropriate spread on high beam.
Installation in Hollow Projectors
When installing Durvient LED headlights in hollow projectors, the same 3 o’clock, 9 o’clock orientation applies. However, we recommend rotating the LED to observe the beam cut-out and making adjustments as needed. This will help you achieve the best possible lighting performance from your Durvient LED headlight.
Final Thoughts on Durvient Headlight Installation
Upgrading your vehicle’s lighting with Durvient LED headlights offers a significant boost in brightness and efficiency, making night driving safer and more comfortable. By following the correct installation process and ensuring proper LED orientation, you can fully leverage the advanced technology of your Durvient headlight. Whether you’re installing LEDs in reflector-based headlights or hollow projectors, the steps outlined in this guide will help you achieve a professional-grade upgrade. Remember, proper installation is key to getting the most out of your Durvient LED headlights—ensuring powerful performance without compromising your vehicle’s battery life.
For more information on the latest Durvient headlight products and installation guides, visit Durvient.com.

 Headlights
 Internal & External Lights
 Auto Parts
 Accessories
 Connectors & Tools
 Electronics
 Drone Accessories
 Drone Parts